Creating a WebUI
Here you can find a summary of the steps to take for creating a WebUI for your AIMMS app:
Important
Please make sure that your application name does not include any of the following special characters: /*:<>?\|"@;,'!^#$%+. The WebUI will fail to load applications that contain any of these characters in their names.
In AIMMS versions prior to AIMMS 24.4
Check the Requirements section.
Download (the latest version of) the AIMMS development system.
Make sure you have the latest version of preferably the Chrome browser (as it performs the best), or Microsoft Edge.
In the AIMMS development system, open an existing application or create a new one.
New application projects contain the
AimmsPROLibraryand theAimmsWebUIsystem libraries by default. If you already have an older project, it might not contain these libraries, yet. In that case, you need to extend your model with these libraries. To add AIMMS libraries to your model: go to the Library Manager of AIMMS (in the File menu) and select Add System Library.Start WebUI by clicking on WebUI in the AIMMS toolbar, or by using the WebUI (sub)menu in the AIMMS Tools menu. The first time, this will create a WebUI folder in your Main Project subfolder. When using Start WebUI, the WebUI is started without opening a browser. When you select one of the browsers, WebUI is started and the browser is opened at the home page of your app.
Now you can follow the WebUI tutorial! Once you are done, you can publish your app on AIMMS PRO.
In AIMMS 24.4 and higher
From AIMMS version 24.4 onwards, the WebUI is not included in AIMMS itself anymore, but rather as a repository library. This allows us to release WebUI updates independently of AIMMS itself, resulting in shorter WebUI release cycles. It has the added benefit that you can combine a (slightly) older AIMMS version that works stable in your setup with the latest WebUI features. This means that you first have to add the WebUI library from our Library Repository. In practice, this does not change the way in how to set up a project for WebUI: as long as you have the option ‘Include WebUI Library’ checked on the New Project dialog of AIMMS, it will be automatically added.
If you decide in a later stage than upon project creation to use the WebUI, you should go to the AIMMS library manager through the File - Library Manager menu. In the Library Manager, please click on the ‘Add Library from Repository…’ button and select the WebUI library in the dialog that appears.
After having performed this step, the AIMMS WebUI will work just as it has always worked in earlier AIMMS versions.
Opening existing WebUI models in AIMMS 24.4 and higher
If you are using an AIMMS version 24.4 or higher, and you want to run an existing WebUI model (that you created using an older AIMMS version), this is perfectly possible. Upon opening such a model, you will be alerted by the following dialog:
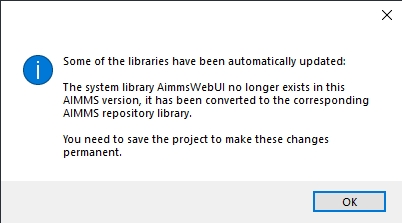
If you click away this message and save your model, you can work with the model as usual.
An exception is the use on PRO: when opening an AIMMS WebUI app created with an AIMMS version prior to AIMMS 24.4, you will get an error message. To mitigate this, please open your model with the latest AIMMS 24.4 or higher and re-create the .aimmspack file.
Opening WebUI models created in AIMMS 24.4 in earlier AIMMS versions
The opposite scenario, opening WebUI models created in AIMMS 24.4 in earlier AIMMS versions, is not possible.
Note
As mentioned in Requirements section, support for Internet Explorer 11 has been deprecated. Should you nevertheless run IE11, please note that there is a known problem: if you face a blue screen after starting your WebUI app in the browser, you should verify that the setting “Display Intranet Sites in Compatibility View” is set to unchecked. You can find this option under “Compatibility View Options” in the main menu of IE11.
Public Identifiers
To be able to control which identifiers are visible to the end-user when adding content to the WebUI pages (more specifically, when selecting the contents for an existing widget), you can extend your AIMMS model with a set called AllPublicIdentifiers (in the global Main namespace of your app). This set should be a subset of the predefined set AllIdentifiers and should be initialized with those identifiers which you want to make public to the end-user of the WebUI.
When running in development mode, the content of this set is ignored. This means that you can simply see all identifiers declared in your model from within the WebUI which you are building. When deploying your finished WebUI application on AIMMS PRO for the end-users, only the identifiers which are in the set AllPublicIdentifiers are available to end users who try to add or modify contents of the existing widgets in the app. However, if you, as an app developer, have created widgets containing identifiers not present in the AllPublicIdentifiers set, the end-user is still able to see the data of these identifiers through these widgets, taking into account whether the WebUI is authorized to display the data of such identifiers (see the Authorization section above).
As a result of the way of working described above, if the set AllPublicIdentifiers is declared in your model but is empty, then all identifiers are available to the WebUI app developer when in developer mode, but no identifiers are available to the end user when running the WebUI app on the PRO platform (i.e. if the end user tries to add or modify contents in existing widgets). In such a case, the end user may only use the existing widgets with the content identifiers set up initially by the app developer.
If the set AllPublicIdentifiers is not declared (the default situation), then all the identifiers in your model are available in both developer mode and the app published on PRO.
Identifiers in a Library
To be able to show data for identifiers that are declared in an AIMMS library, you need to make those identifiers public by putting them in the Interface attribute of the library. The corresponding index domain sets need to be present in the library interface too. Please remember to add them to the set AllPublicIdentifiers, if you have specified this set in your model.
You might wonder why the corresponding index domain sets should be present in the library interface. The reason for this is that these index domain sets are used to display aggregated values (by pivoting/moving indices to the Aggregated group) in a widget. More precisely, AIMMS creates runtime identifiers in order to calculate these aggregated values (such as totals). To be able to evaluate the definitions of these runtime identifiers, the domain indices of the identifier need to be accessible too.
When adding project-specific translations to your WebUI project and (some of) the translation identifiers are located in a library, please make sure to include the library prefixes to the .properties translation file.