Workflow Panels
This section describes various tasks related to the creation, the configuration, and the usage of workflow panels in a WebUI application.
Important
Workflow panels are available in software versions from AIMMS 4.68 onwards.
Starting from AIMMS 4.92, one sub-level of steps can be configured for a workflow step. This makes it easier to apply a hierarchical organization in your workflow(s).
Starting from AIMMS 26.5, the look-and-feel of the workflow panel has been improved. The top screenshot shows this new look-and-feel, while the other screenshots do not necessarily reflect the latest look-and-feel of the workflow panel.
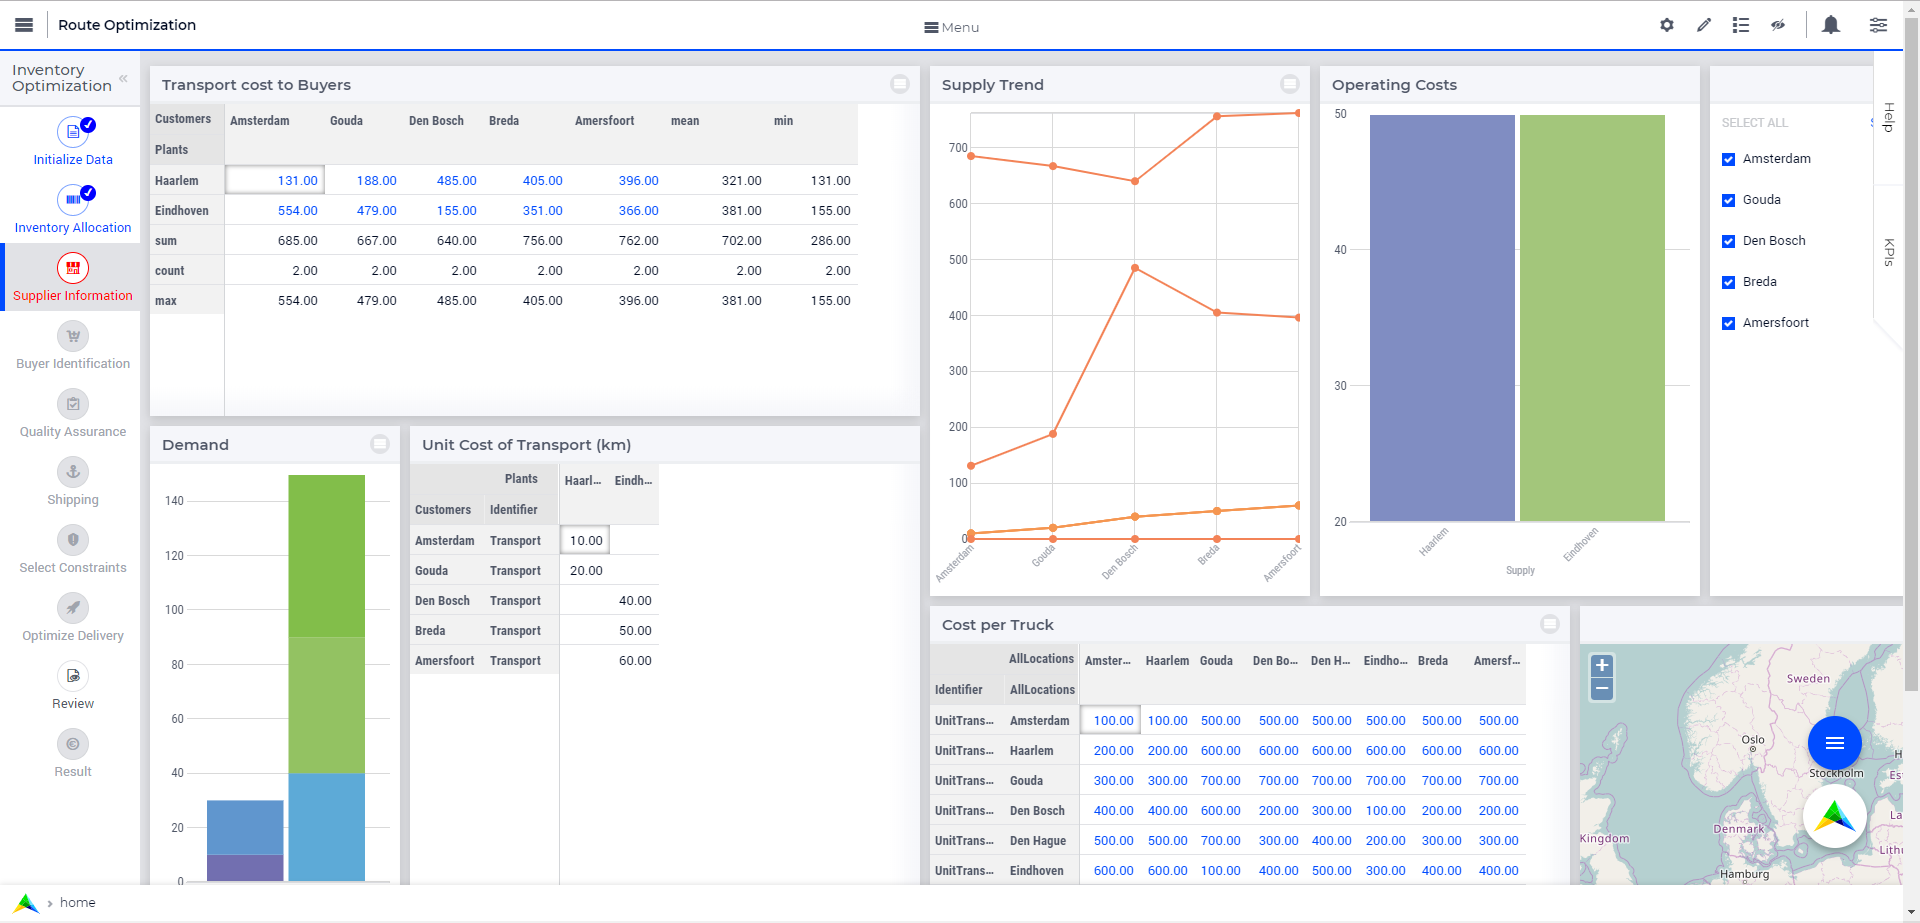
Starting from AIMMS 4.68, it is possible to design and configure Workflows in the AIMMS WebUI. The Workflow Panel is used to represent and run any workflow which is designed and defined by the application developer in the model. AIMMS allows the application developer to configure multiple workflows in an application.
A Workflow Panel is a progression of steps (tasks, events, interactions) that comprise a work/business process and create or add value to the organization’s activities.
The Workflow Panel guides the user through the defined set of steps in a specific workflow. It also gives the user the flexibility to enter or leave a workflow at any step of the process. The user can also navigate between workflows, so there is no restriction to only one workflow at a time.
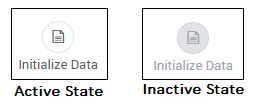
The workflow has states for each step that indicate to a user which steps can or cannot be accessed. Data states help indicate which steps are complete, incomplete or in an error state, as illustrated below.
The Workflow Panel can also be collapsed and expanded horizontally, in order to save screen space:
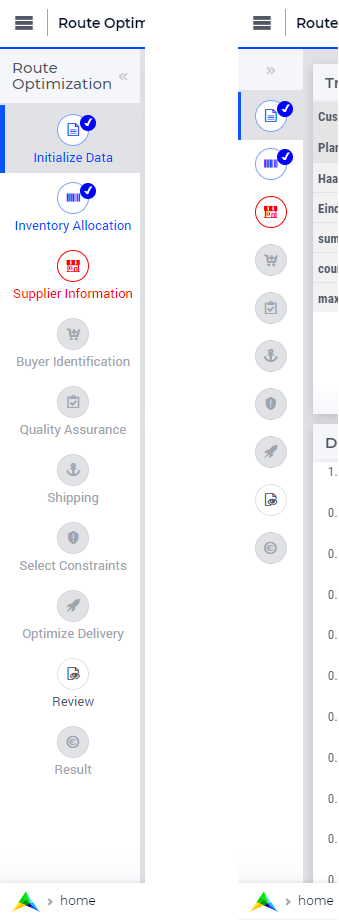
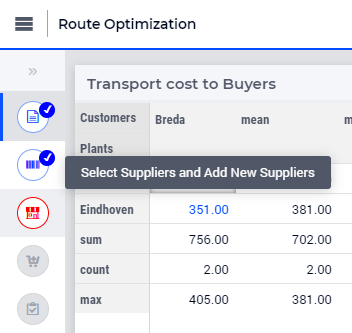
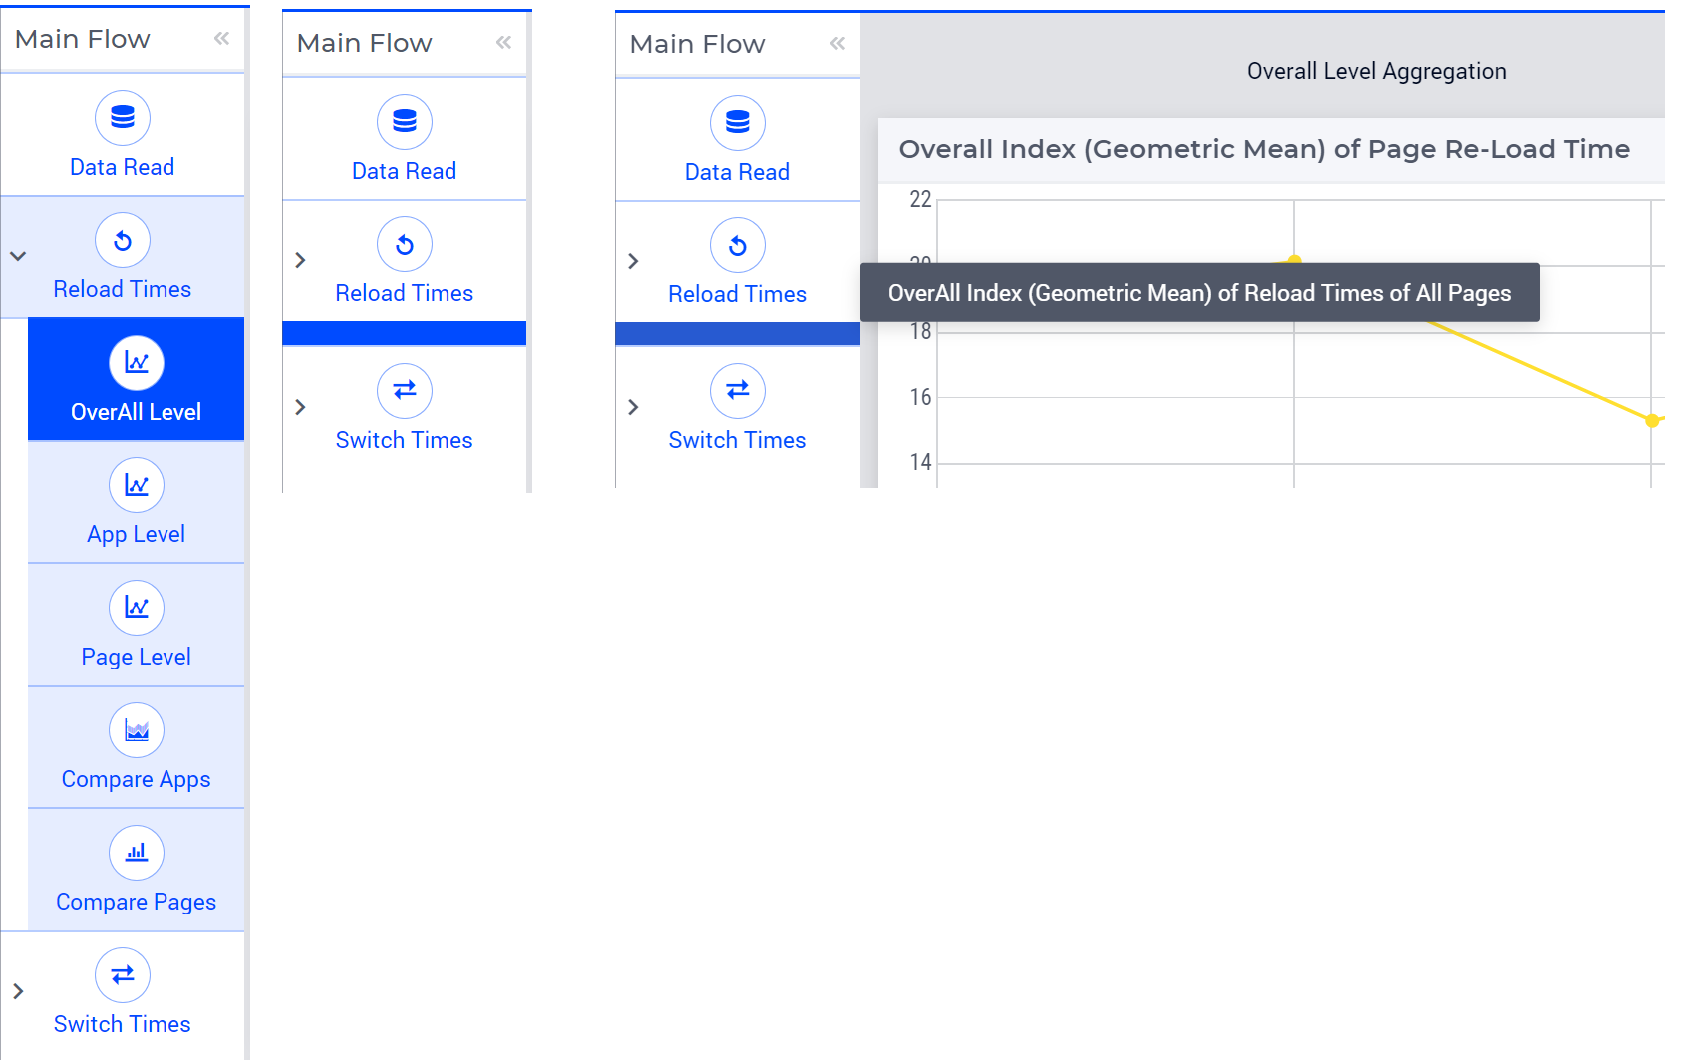
In the horizontally collapsed view, when the user hovers over a step the tooltip helps with identifying the purpose of it:
Configuring Workflow Panels
The Workflow Panel can be configured by the application developer via the AIMMS model. Public Workflow Support Declarations have been defined inside the Pages and Dialog Support section of the AIMMS WebUI system library. These pre-declared identifiers are used to configure different workflows and their respective steps.
In order to configure the Workflow Panels in the application, first you need to create two string parameters. The first string parameter will configure the number of workflows in the application, while the second string parameter will configure the steps of each workflow.
Note
When creating the string parameters to configure workflows and their steps, the first index for configuring Workflows and the first and second index for configuring Workflow Steps must be in a subset of integers.
You can create your own subset of integers in the model and use its index(es) in this context.
However, for convenience, you can actually use for this purpose the existing indexes of the pre-declared set ExtensionOrder, that is, the indexes indexWorkflowOrder and indexNoOfPages.
Configuring Workflows
The first string parameter must be indexed by the ExtensionOrder set with the index indexWorkflowOrder and by the WorkflowSpecification set with the index indexWorkflowSpec, like MyWorkflows(webui::indexWorkflowOrder,webui::indexWorkflowSpec). This string parameter is used to define the number of workflows and their respective titles. The values of this string parameter may be initialized in the Initial Data attribute, in a procedure or manually, by right clicking the string parameter and clicking on the Data option in order to open its data page. There you can add the details for the Workflow and its titles (leave the style property empty for now):
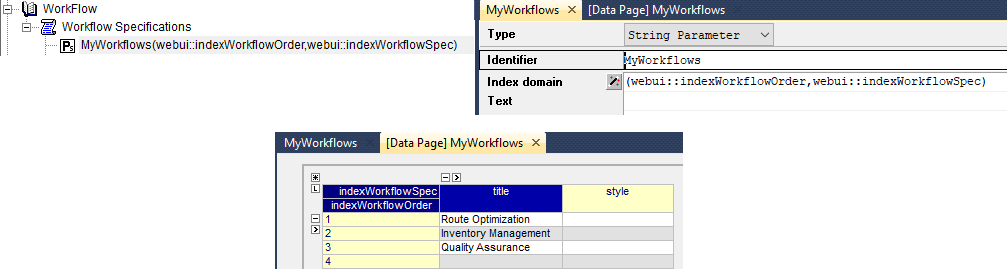
The values in the example above indicate that there are 3 workflows in the application at hand.
Configuring Steps of Workflows
The second string parameter must be indexed over both indexes of the set ExtensionOrder (i.e. indexWorkflowOrder and indexNoOfPages) and over the index indexWorkflowPageSpec of the set WorkflowPageSpecification , so, it should have a declaration of the following form MyWorkflowSteps(webui::indexWorkflowOrder,webui::indexNoOfPages,webui::indexWorkflowPageSpec). This string parameter is used to define the steps for each workflow which has been defined in the MyWorkflows string parameter described above. In particular, each pageId which is configured becomes a step displayed in the Workflow Panel, see further below.
Note
The indices must follow the same order as described in the string parameter MyWorkflowSteps(webui::indexWorkflowOrder,webui::indexNoOfPages,webui::indexWorkflowPageSpec)
The pageId is a required field.
The values may be inspected on the Data page of the string parameter MyWorkflowSteps:
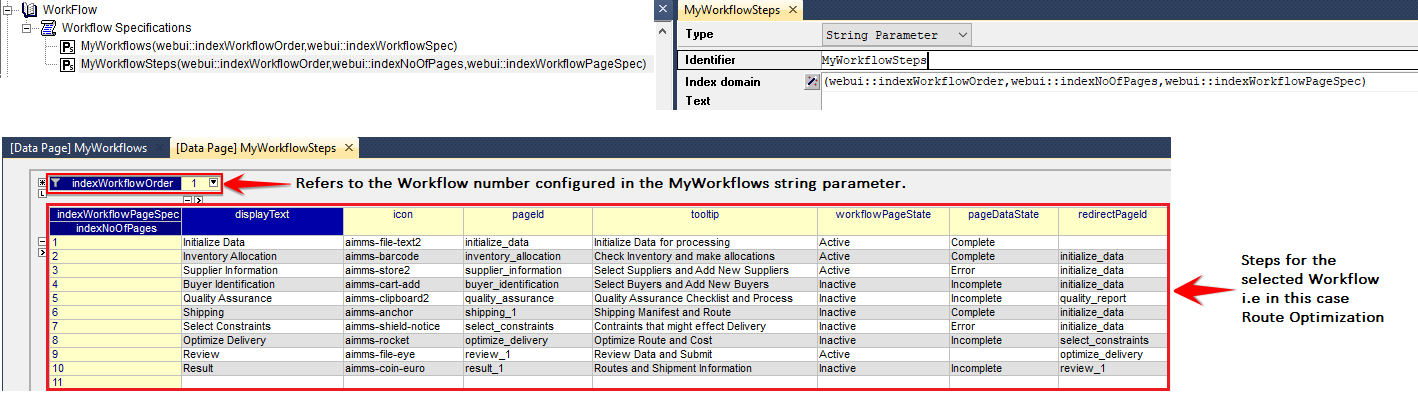
The data entered in the illustration above is for the first workflow which was configured in the “MyWorkflows” string parameter, that is, the Route Optimization workflow (with 10 steps defined).
There is no explicit limit for the number of steps each workflow may have. However, the practical recommendation is to use no more than 10 steps per workflow. If more than 10 steps are required, then please try to break down the workflow into smaller workflows, whenever possible.
In order to configure the steps for the other workflows, you can simply select the respective value for webui::indexWorkflowOrder at the top in the Data page as shown above.
For instance, the following three steps may be configured for the second workflow Inventory Management:

Similarly, an example of configuring 4 steps for the third workflow Quality Assurance is illustrated here:

Note
Do not use in a workflow a page which is already configured with a wizard, this will result in an undesired behavior.
The specifications pageId
pageId is case-sensitive.webui::AllRegularPages identifier data. Only the Id’s of regular WebUI pages, excluding Dialog pages or SidePanel pages, should be referenced for pageId.Important
It’s important not to confuse the name of the page with the page’s unique Id.
The specifications workflowPageState and pageDataState
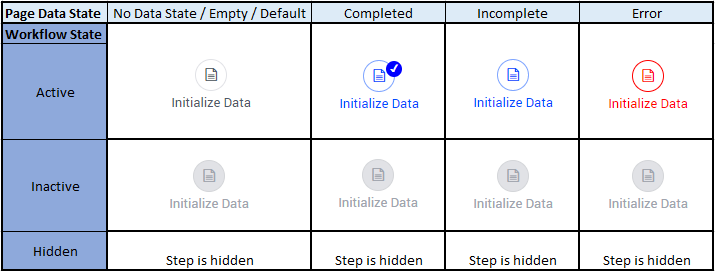
The workflowPageState determines the actionable state of a step in the workflow. In this context, a step can have an Active (displayed and clickable), Inactive (displayed and not clickable) or Hidden (not displayed) state. This state is used to control the flow of actions in the workflow. Some steps can be made accessible only when certain conditions are met. For example, in a sequential workflow the next step should be accessible only when the current step is considered done.
The pageDataState determines the data state of a page. This kind of state indicates whether a step is Complete, Incomplete or in an Error state. There is a default (Empty) state as well when a certain step does not need a data state, for example an “Instruction” or an “Introduction” type of page.

These two states are actually interdependent, hence the style of a displayed step may change accordingly as illustrated below:
These states can be changed dynamically, as required, and as the user progresses in the workflow. This is achievable either by applying data changes made on a page or by using model procedures which are triggered based on certain actions in the front end.
Note
Although hidden or inactive pages cannot be opened through the workflow itself, by using the page menu on top or by typing the URL directly, app developers can still access them by using the App manager.
The specification redirectPageId
In case of an invalid pageId or when the workflowPageState for a certain step is Inactive or Hidden, the workflow will be redirected to the page indicated by the redirectPageId. This is a fallback scenario for the situation in which a user tries to access a page in a workflow, via the Menu or by an OpenPage procedure defined somewhere in the application, but the page is not made available to the workflow yet. The redirectPageId is typically a page which is part of the same workflow. This ensures that the user stays in the workflow and learns that a previous step needs to be completed before accessing other steps of the workflow.
When the redirectPageId is also invalid or not defined, an error is generated and the workflow stays on the current step. There is also a possibility that the workflow steps enter a loop. Then the redirection is applied 25 times, after which an error is generated and the workflow stays on the current step page.
Combinations of specifications
The table below represents different combinations which can arise when creating a workflow and the actual result in each scenario:
S.No |
|
|
|
Result |
|---|---|---|---|---|
1 |
Valid |
Active |
Valid |
Go to workflow step |
2 |
Valid |
Active |
Invalid |
Go to workflow step AND display |
3 |
Valid |
Active |
Undefined |
Go to workflow step |
4 |
Valid |
Inactive/Hidden |
Valid |
Redirect user to the |
5 |
Valid |
Inactive/Hidden |
Invalid |
Display Error 1 AND |
6 |
Valid |
Inactive/Hidden |
Undefined |
Display Error 1 |
7 |
Invalid |
Active |
Valid |
Display Error 2 |
8 |
Invalid |
Active |
Invalid |
Display Error 2 AND |
9 |
Undefined |
Active |
Valid |
Display Error 2 |
10 |
Invalid |
Inactive/Hidden |
Valid |
Display Error 3 |
11 |
Invalid |
Inactive/Hidden |
Invalid |
Display Error 3 |
12 |
Undefined |
Inactive/Hidden |
Valid |
Display Error 3 |
13 |
Valid |
Inactive/Hidden |
Invalid/Undefined |
Redirect user to Main Project, Display Error 1 and |
Error 1 |
Workflow: The page you tried to access is part of a workflow and currently not accessible. |
Error 2 |
Workflow: Page not found. |
Error 3 |
Page: Page not found. |
|
Workflow: The redirect page for the step is not found. |
The specification parentPageId
From AIMMS 4.92 onwards, it is possible to specify one sub-level of child steps for a step in a workflow by configuring this step as a parent step in the workflow panel.
This allows for a better structuring of some workflow steps which are closely related to each other (e.g., by grouping them as the child steps of the same parent).
For each of the child steps of a parent step you must specify the pageId of that parent step as the value of the attribute parentPageId of the child step.
Note
Sub-level steps can be exactly one level deep. So specifying a parent page of another parent page will result in an error message.
For example, suppose that the configuration string for the workflow steps contains (among others) the following data values:
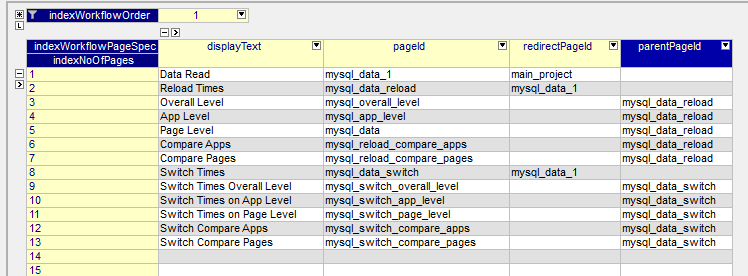
This setting will result in a workflow panel with two parent steps (indicated by the presence of the ‘>’ sign on the left side of such a step) as illustrated in the pictures below:
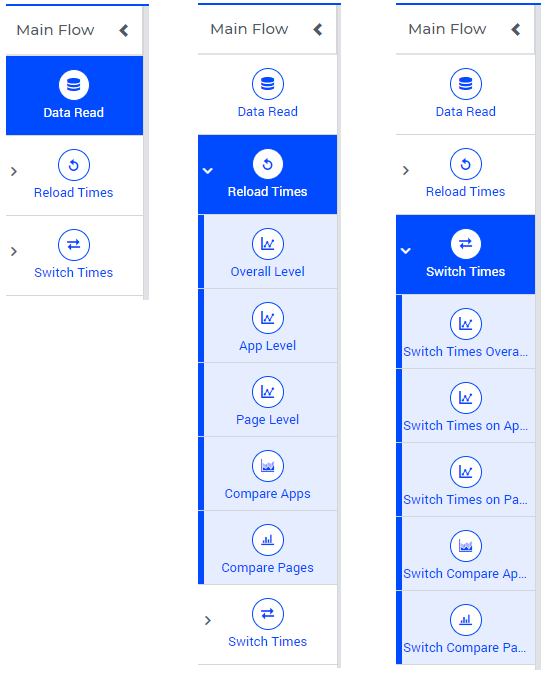
The user can perform a manual click action on the ‘>’ sign on the left side of a parent step in order to toggle the folding/unfolding of that step in the panel (see also further below).
The specification of the openClose state
Also starting from AIMMS 4.92, another (third) string parameter can be used in the Workflow Settings in order to store the folding state of a parent step, which may be expanded (in ‘open’ state) or collapsed (in ‘close’ state) in the workflow panel.
This string parameter must be indexed over both indexes of the set ExtensionOrder (i.e. indexWorkflowOrder and indexNoOfPages)
and over the (pre-declared) index indexOpenCloseProps of the set OpenCloseStateProperty (which is pre-declared in the “Public Declarations” section of the WebUI Library and contains the set element openClose).
So, this third configuration parameter should have a model declaration of the following form:
MyWorkflowStepsFoldingStates(webui::indexWorkflowOrder,webui::indexNoOfPages,webui::indexOpenCloseProps)
When a parent step is collapsed, then its child steps are not visible in the workflow panel. The child steps are made visible in the panel when the parent step is expanded (see also the pictures above). When the current page corresponds to a child step and its parent step is collapsed. A blue bar is displayed beneath the parent node (see also the pictures above). The current step’s tooltip is displayed when you hover over this blue bar. When clicked, the parent step expands to reveal the currently selected child step again.
The expanded and collapsed states of a parent step correspond to setting the openClose option to the values open and close, respectively (as values of the open/close states configuration parameter mentioned above).
For instance, in the picture below the workflow panel on the left hand side corresponds to the data values of the openClose option shown on the right hand side:
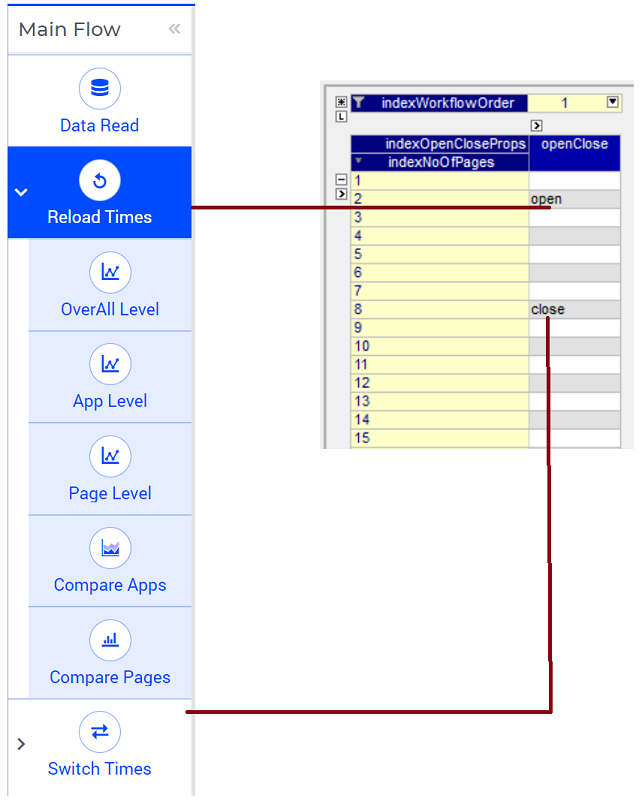
In particular, the manual actions for expanding or collapsing a parent step in the panel will result in toggling the corresponding value of the openClose option between the values open and close.
Also, when the user navigates to a page which is a child step in a workflow, then the parent step of that child step is expanded and the child step itself is highlighted with a blue background in the workflow panel.
Therefore, it is recommended that the open/close states configuration parameter mentioned above is writable (that is, not read-only by using a definition in the model). In this case, the workflow will work smoothly (without warnings) in interaction with the user actions for folding or unfolding parent steps and the configuration parameter will be automatically updated to stay in sync with the actual workflow states in the panel.
If the app developer still decides to give a definition to this configuration parameter (so, making it read-only, which is not recommended), then a manual action for expanding or collapsing a parent step would result in an error stating that the configuration parameter may not be overwritten. Moreover, in such a case, the app developer should pay special attention not to use a dense definition (like 5000+ steps), which could result in a data overflow error and prevent the loading of the workflow altogether (see also the Configuration Error Validation section below).
When the open/close states parameter is configured in the Workflow Settings (see further below), then its stored data is applied dynamically to the workflow(s) in the app such that the last saved states become persistent upon re-loading a WebUI page.
Changing States
As mentioned earlier, the workflowPageState and pageDataState can be changed dynamically while the user performs actions in the workflow. The user can also be restricted from leaving a certain step if some data is incorrect or certain actions need to be performed before moving to any other step or page.
To change the workflowPageState of a step in a workflow, simply reference the workflow and the step number in the “MyWorkflowSteps” string parameter and assign the desired value. For example:
MyWorkflowSteps(1, 2, 'workflowPageState') := "Active";
The above illustration sets the workflowPageState for Step 2 (i.e. Inventory Allocation) in Workflow 1 (i.e Route Optimization) to “Active”.

Similarly, to change pageDataState, an assignment statement like the following may be used in a model procedure:
MyWorkflowSteps(1, 2, 'pageDataState') := 'Complete';
If you need to validate some data or actions and maybe to retain the user on the same step, please follow the steps explained in Procedure for Restricting Page Navigation. .
Configuring Workflows in the Application Settings
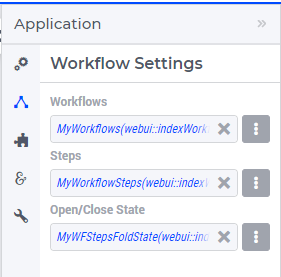
To enable the Workflow Panel, click on the Application Extensions icon  of the Application Settings and add the configured string parameters to the respective fields as illustrated below:
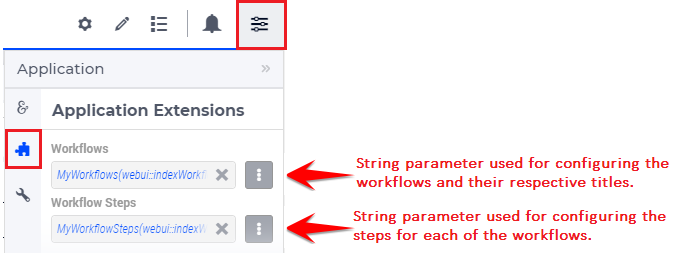
Once the string parameters are added in their respective fields, the Workflow Panel functionality will become visible on the pages which are part of a workflow.
Starting from AIMMS 4.92, the third configuration parameter used for open/close folding states (see explanation above) may be configured as well in the Workflow Settings section of the Application Settings as illustrated in the following picture:
If the open/close states parameter is not configured in the Workflow Settings, then the open/close states in the workflow panel are not stored in the model and therefore, they are not persistent upon re-loading a WebUI page.
Configuring a pageId in multiple workflows
Most of the times, configuring a page in only one workflow will suffice for the application at hand. However, the Workflow functionality is flexible enough such that one page may be configured in multiple workflows, if necessary. If a page is shared between multiple workflows, you will remain in the workflow that is currently displayed.
For example, if a page ‘Results’ with pageId = results_1 is configured for two workflows “Route Optimization” and “Inventory Management”, then the page Results will appear in both workflows, as illustrated below.
The page Results is configured for two workflows:
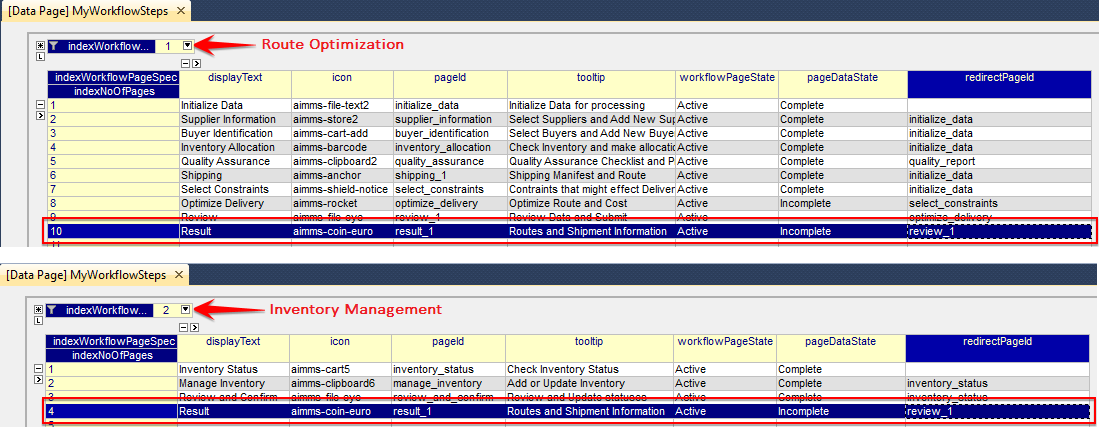
The page Results is shown as a step in both workflows:
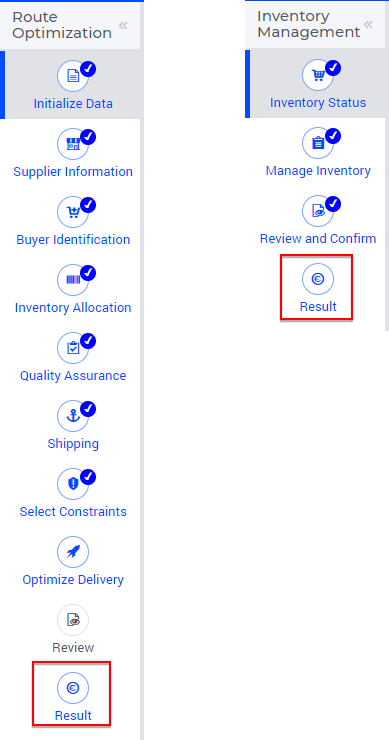
In this case, when the user is on the Inventory Management workflow and clicks on the Results step, he will remain in the Inventory Management workflow. Only when accessing another page, which is part of the Route Optimization workflow only, he is directed to that workflow. After that, clicking on the Results step will still keep him on the Route Optimization workflow.
Configuration Validation and Error Messages
From AIMMS 4.92 onwards, the configuration validation process has been adjusted and improved. Now all workflow configurations are validated upon starting up the WebUI. If any of the workflows is incorrectly configured, WebUI issues an appropriate error message and no workflow panel will be displayed at all until all reported error(s) are corrected. In case several errors are found at the same time, the shown error message will inform you in detail about the first encountered error and in addition, it will indicate how many more errors have been detected.
Moreover, starting from AIMMS 4.93, the displayed validation errors are made more intuitive or sufficiently clear in order to indicate where and what has to be corrected. Some examples of incorrect configurations and the corresponding error messages are the following:
When
pageIdis found to be left blank for some step:“The ‘{actual-step-name}’ step in the ‘{actual-workflow-name}’ workflow has an empty
pageIdspecified.”When
pageId/redirectPageIdis specified and found to be invalid (that is, not an Id of an existing page):“In the ‘{actual-workflow-name}’ workflow, the ‘{actual-step-name}’ step has an invalid
pageId/redirectPageIdspecified.”When
parentPageIdis specified and found to be invalid (that is, not an existing page or not a valid entry within the current workflow):“In the ‘{actual-workflow-name}’ workflow, the ‘{actual-step-name}’ step has an invalid
parentPageIdspecified.”When duplicate
pageIdis found specified in a workflow:“Duplicate
pageIdentries of ‘{actual-duplicate-pageid}’ have been specified in the ‘{actual-workflow-name}’ workflow.”When nested steps are configured:
“Nested steps are not supported. The ‘{actual-step-name}’ step in the ‘{actual-workflow-name}’ workflow has a
parentPageIdwhich itself already has aparentPageId.”When an identical entry is specified for both
pageIdandredirectPageId/parentPageId:“In the ‘{actual-workflow-name}’ workflow, the ‘{actual-step-name}’ step has an identical entry specified for both
pageIDandredirectPageId/parentPageId. This is not permitted.”
Again, these are just some examples listed here in order to illustrate the idea. Clearly, there are many more situations in which the workflow configuration string may contain inconsistencies and then an appropriate error message will be issued corresponding to each situation at hand.
Please note that this only happens in developer mode, such that the app developer is informed and can take the appropriate actions for correction. However, the validation errors are not visible in end-user mode, so, the app users will never be confronted with details about misconfigured workflows.
When and How to use the Workflow Panel
When designing a workflow we recommend following some best practices which can make it consistent and easier to use. Below are some practices we advise:
Background
The Workflow Panel can be used when it is important to maintain the user’s focus throughout the process of filling in data into the system. This is similar to the checkout process often found on e-commerce websites. The checkout process is the most critical part of the site, as this is the part that captures the customer’s money. The Workflow shows the user how far they are in the process, and provides a visible end to the process to reach.
Below: example of a typical e-commerce workflow

Branching logic
Next to maintaining focus, the Workflow Panel allows developers to reflect a business process with a sequence of steps. As a user enters information, the model computes the appropriate path and guides the user accordingly. Workflows therefore often have some branching logic, but the perceived user experience is that of a linear flow. The app guides the users from one screen to another and they click “next” to proceed (though you may also give the option “back,” or “cancel”).
Therefore, workflows can be used for processes where the next step depends on the information provided in the previous step(s) and it is critical that steps are completed before progressing to the next one.
An example case for this is an S&OP process. Users need to fill in sales data, refine the sales forecast, do a capacity review, decide on a scenario, and export plans. If these steps are not taken consecutively, the app will produce no result or unreliable results.
Flows and user groups
Some applications have multiple user types, which each have their own goal and functionalities. An application can facilitate this by having multiple workflows tailored to each user group. For users that do not use the app very often, a Workflow Panel can help to guide them through the process.
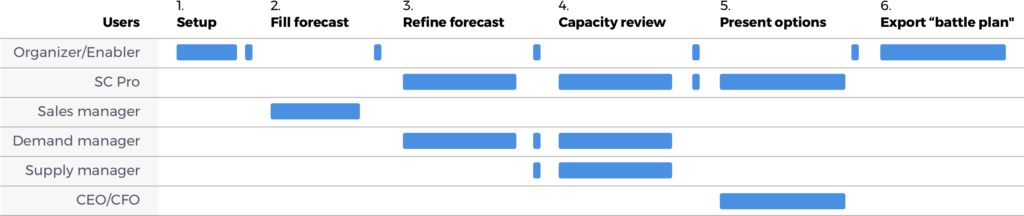
Above: steps in an S&OP process per user group.

Above: example of the Workflow panel in S&OP Navigator.
Do’s and don’ts
✅ Do
Use the Workflow panel for a process that has related steps that are part of the same goal a user is trying to achieve. The steps may (or may not) need to be completed in a specific order.
For example, when doing a tax return, a user must enter data such as income details, property, savings, and family situation. These steps do not always need to be done in a certain order, but all need to be filled out to complete the tax return.
🚫 Don’t
The Workflow steps are not tabs, meaning that if the steps are not directly related and are not part of the same goal, the Workflow panel is not the best choice. Using it in this way can be disruptive and confusing.
✅ Do
Steps should be self sufficient, meaning that users do not need to navigate to other pages to gather information in order to complete the step.
🚫 Don’t
You should not require users to exit and re-enter the workflow in order to complete it.