Working with trees
Working with trees
The trees used in the various developer tools inside AIMMS offer very similar functionality to the directory tree in the Windows Explorer. Therefore, if you are used to working with the Windows Explorer, you should have little difficulty understanding the basic functionality offered by the trees in the AIMMS tools. For novice users, as well as for advanced users who want to understand the differences to the Windows Explorer, this section explains the fine details of working with trees in AIMMS, using the context of the model tree.
Expanding and collapsing branches
Branches in a tree (i.e. intermediate nodes with subnodes) have a small expansion box in front of them containing either a plus or a minus sign. Collapsed branches have a plus sign +,, and can be expanded one level by a single click on the plus sign (to show more information). Expanded branches have a minus sign -, and can be collapsed by a single click on the minus sign (to show less information). Alternatively, a node can be expanded or collapsed by double clicking on its icon. Leaf nodes have no associated expansion box.
Double-clicking a node
When you double-click (or press Enter) on the name of any node in a tree, AIMMS will invoke the most commonly used menu command that is specific for each tree.
In the Model Explorer, the double-click is identical to the Edit-Attributes menu, which opens the attribute window for the selected node.
In the Identifier Selector, the double-click is identical to the Edit-Open With menu, which opens a view window to simultaneously display the contents of the selection.
In the Page and Template Manager, the double-click is identical to the Edit-Open menu, which opens the page or template.
In the Menu Builder, the double-click is identical to the Edit-Properties menu, which opens the appropriate Properties dialog box.
Alternatively, you can open the attribute form or Properties dialog
box of any node type using the Properties button  on the
toolbar.
on the
toolbar.
Creating new nodes
To create a new node in the model tree you must position the cursor at the node in the tree after which you want to insert a new node. You can create a new node here:
by clicking on one of the node creation icons
 or
or
 on the toolbar
by selecting the item Insert… from the right-mouse menu, or
by pressing the Ins key on the keyboard.
The toolbar contains creation icons for the most common node types. You
can select the New… icon  to select further node types.
Selecting a node type
Once you have clicked the New… icon on the toolbar, or
selected the Insert… menu from the right-mouse menu, or have
pressed the Ins key, a dialog box as shown in
Fig. 15
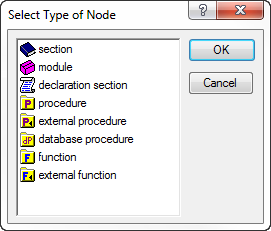
Fig. 15 Dialog box for selecting a node type
appears from which you have to select a node type. The dialog box shows only those node types that are allowed at the particular position in the tree. You can select a node type by a single mouse click, or by typing in the first letter of the node type that you want to insert. When there are more node types that begin with the same letter (as in Fig. 15), re-type that letter to alternate over all possibilities.
Naming the node
After you have selected a node type, it is inserted in the model tree, and you have to enter a name for the new node. In the model tree, all node names must consist only of alphanumeric characters and underscores, and must start with a letter. In addition, the names of structuring nodes may contain spaces. For most node types their node names have to be unique throughout the model. The only, quite natural, exception are declaration sections which accept either the predefined name Declaration or a name unique throughout the model.
Expanding branches without subnodes
When you want to add subnodes to a branch, you must first expand the branch. If you do not do this, a new node will be inserted directly after the branch, and not as a subnode. Expanding an empty branch will result in an empty subtree being displayed. After expansion you can insert a new node in the usual manner.
Renaming existing nodes
You can rename a selected node by pressing the F2 button, or single clicking on the node name. After changing the name, press the Enter key to action the change, or the Esc key to cancel. When the node is an identifier declaration, a procedure, or a function which is used elsewhere in the model (or displayed on a page in the graphical user interface), AIMMS will, if asked, automatically update such references to reflect the name change.
Multiple selections
Unlike the Windows Explorer, AIMMS lets you make multiple selections within a tree which you can delete, cut, copy and paste, or drag and drop. The nodes in a selection do not even have to be within the same branch. By left-clicking in combination with the Ctrl key you can add or delete single nodes from the selection. By left-clicking in combination with the Shift key you can add all nodes between the current node and the last selected node.
Deleting nodes and branches
You can delete all nodes in a selection by selecting Delete from the right-mouse menu, or by pressing the Del key. When the selection contains branch nodes, AIMMS will also delete all child nodes contained in that branch.
Cut, copy, paste and duplicate
With the Cut, and Copy and Paste items from the Edit menu, or right-mouse menu, you can cut or copy the current selection from the tree, and paste it elsewhere. In addition to the usual way of pasting, which copies information from one position to another, AIMMS also supports the Paste as Duplicate operation in the Identifier Selector, the Template Manager and the Menu Builder. This form of pasting makes no copy of the node but only stores a reference to it. In this way changes in one node are also reflected in the other.
Drag and drop support
In addition to the cut, and copy and paste types of operation, you can drag a node selection and drop it onto another position in the model tree, or in any of the other tools offered by AIMMS. Thus you can, for instance, easily move a declaration section to another position in the model tree, or to an existing selection in the selection manager.
Copying or moving with drag and drop
By pressing the Shift or Ctrl keys during a drag-and-drop action, you can alter its default action. In combination with the Shift key, AIMMS will move the selection to the new position, while the Ctrl key will copy the selection to the new position. With the Shift and Control key pressed simultaneously, you activate the special find function explained in the next paragraph. AIMMS will show the type of action that is performed when you drop the selection by modifying the mouse pointer, or by displaying a stop sign when a particular operation is not permitted.
Searching for identifiers
AIMMS offers several tools for finding model-related information quickly and easily.
When the attribute of an identifier, or the body of a procedure or function, contains a reference to another identifier within your application, you can pop up the attribute form of that identifier by simply clicking on the reference and selecting the Attributes… item from the right-mouse menu.
With the Find… item from the Edit menu (or the Find button
 on the toolbar) you can search for all occurrences
of an identifier in your entire model or in a particular branch. The
Find function also offers the possibility of restricting the
search to only particular node attributes.
on the toolbar) you can search for all occurrences
of an identifier in your entire model or in a particular branch. The
Find function also offers the possibility of restricting the
search to only particular node attributes.The Identifier Selector offers an advanced tool for creating identifier selections on the basis of one or more dynamic criteria. You can subsequently select a view from the View Manager to display and/or change a subset of attributes of all identifiers in the selection simultaneously. Selections and views are discussed in full detail in Viewing Identifier Selections.
By dragging a selection of identifiers onto any other tree while pressing the Ctrl and Shift key simultaneously, AIMMS will highlight those nodes in the tree onto which the selection is dropped, in which the identifiers in the selection play a role. This form of drag and drop support does not only work with identifier selections, but can be used with selections from any other tree as well. Thus, for instance, you can easily find the pages in which a particular identifier is used, or find all pages that use a particular end-user menu or toolbar.